¶ ID.IPB.PT :: Multi-Factor Authentication (MFA) Setup Guide
¶ Table of Contents
- Introduction
- Why Multi-Factor Authentication?
- Quick Summary
- Getting Started
- Initial Login and OTP Setup
- Additional MFA Options
- Managing Your Security Settings
¶ Introduction
This tutorial will guide you through setting up Multi-Factor Authentication (MFA) for your account at id.ipb.pt. When you access this portal, you'll be redirected to the Account Console where you can secure your account using multiple authentication methods.
¶ Why Multi-Factor Authentication?
Multi-Factor Authentication adds an extra layer of security to your account by requiring more than just a password. This protects your account from unauthorized access, even if someone obtains your password. With MFA enabled, attackers would also need access to your authentication device, making your account significantly more secure.
Using this feature requires the use of a personal smartphone to perform a second account access verification through an OTP (One-Time Password) mechanism.
¶ Quick Summary
Sequence of steps you need to follow to activate multifactor authentication when accessing IPB's electronic services:
- Install an authenticator app on your Android or iOS mobile device (e.g., Microsoft Authenticator, Google Authenticator, or FreeOTP)
- Access id.ipb.pt in your browser and authenticate with your IPB credentials
- On your first access to this platform, you will be prompted to Configure Mobile Authenticator (Required)
- With the authenticator app installed on your mobile device, look for the option to read a new QR code and then point the camera to read the QR code displayed in the browser
- After reading the QR code, the authenticator app adds a new entry with a name of the type "ccom:my_username". Clicking on this entry will display a 6-digit code. Enter this Unique Code in the "Authentication Code" field on the page opened in your browser. Set a name for the device in the Device Name field. Press Confirm to complete the process.
- Now you have completed all the necessary configuration.
- From now on, whenever you authenticate to IPB's electronic services, you will use your username, the corresponding password, and the One-Time Password (OTP) code (the 6-digit code) that you obtain at that moment from the authenticator configured on your smartphone.
IMPORTANT NOTES:
- The QR code is only displayed when you configure/activate multifactor authentication. After the configuration is complete, to authenticate to IPB services you will only use the 6-digit code generated at the moment by the entry added in the authenticator.
- After completing the configuration/activation of multifactor authentication, do not delete the entry you added or uninstall the Authenticator!
- A new OTP code is automatically generated for each authentication interaction (valid for 30 seconds), therefore, every time you authenticate to an IPB electronic service, you must open the authenticator application you configured on your mobile device and, by clicking or viewing the configured entry (identified by "ccom:my_username"), obtain the 6-digit code displayed there.
If you encountered any difficulties following the steps described above, you can continue with the rest of the tutorial, which explains each step in more detail.
If, on the other hand, you successfully reached the end of step 6 above, you can complete your setup here.
¶ Step-by-step activation
¶ Getting Started
- Navigate to id.ipb.pt in your web browser
- You will be automatically redirected to the Account Console login page
- Enter your username (ex: a41724)**
¶ Initial Login and OTP Setup
¶ First-Time Login
When logging in for the first time, you'll be prompted to complete the following steps:
-
Enter Your Password
- After entering your username, provide your password
- Click Sign In
-
Mobile Authenticator Setup (Mandatory)
You will see the following screen:

¶ Step-by-Step OTP Configuration
¶ Step 1: Install an Authenticator App
Choose and install one of the following applications on your mobile device:
- FreeOTP (Open source option)
- Microsoft Authenticator (Recommended)
- Google Authenticator (Recommended)
Note: Microsoft Authenticator and Google Authenticator are the most widely used and reliable options. Both are available for free on:
- Google Authenticator (Android)
- Microsoft Authenticator (Android)
- Google Authenticator (iOS)
- Microsoft Authenticator (iOS)
¶ Step 2: Scan the QR Code
IMPORTANT: The mobile device's clock must show the correct time (ideally, the date and time setting on the device should be in automatic mode, which provides greater assurance of accuracy). A deviation of even a few minutes in the device's date and time will cause this authentication mechanism to malfunction!
- Open your authenticator app on your mobile device
- Look for an option to Add Account or Scan QR Code (usually a + or camera icon)
- Point your camera at the QR code displayed on the screen
- The app will automatically detect and add your account
Tip: If you're unable to scan the QR code, click on "Unable to scan?" to reveal a manual entry code that you can type into your authenticator app.
¶ Step 3: Enter the One-Time Code
- Once the QR code is scanned, your authenticator app will display a 6-digit code
- Enter this One-time code in the provided field
- (Optional but recommended) Enter a Device Name to help you identify this device later (e.g., "My iPhone" or "Personal Android")
- If you want to sign out from other devices for security, check the "Sign out from other devices" option (You can SKIP this)
- Click Submit to complete the setup
Congratulations! Your Mobile Authenticator is now configured. You'll need to enter a code from your authenticator app each time you log in.
¶ Additional MFA Options
After your initial setup, you can configure an additional (and optional) security method by navigating to:
Here you'll find the additional MFA option of Passkey.
¶ Passkey (Passwordless Authentication)
Passkeys provide the most convenient and secure way to sign in without typing a password or using an authenticator app.
¶ What Are Passkeys?
- Modern cryptographic keys stored securely on your device
- Use biometric authentication (fingerprint, face recognition) or device PIN
- More secure than passwords and faster to use
- Based on FIDO2/WebAuthn standards
¶ Setting Up a Passkey
-
We recommend setting up your passkey using the browser logged in with your google account to store passkey in google password manager or the extention installed called bitwarden for the best experience. Navigate to the Account Security page:
https://id.ipb.pt/ -
Find the Set up Passkey section on the right side of the page, you can see the image below at the section Setting Up Recovery Codes
-
Click Set up Passkey
-
Choose where to store your passkey as shown in the image below:
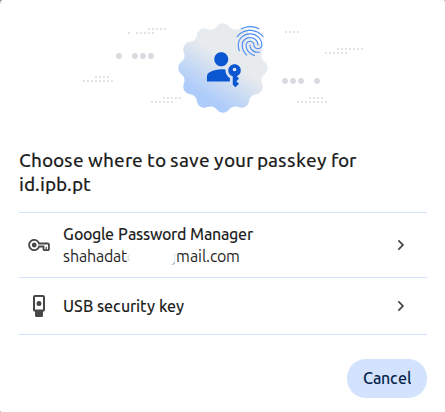
You have three main options:
-
Google Password Manager(Recommended)
- Built directly into Chrome and Android devices
- Automatically syncs across all your devices signed into your Google account
- Access your passkeys from any device (Windows, Mac, Android, iOS) where you're signed into Chrome
- No additional software installation needed
- Free and secure
-
Other Password Managers (Bitwarden Recommended)
- Bitwarden: Free, open-source option with cross-platform sync
- Other compatible password managers
-
USB Security Key (Hardware option)
- Physical security key (e.g., YubiKey)
- Requires the physical key to be present for authentication
- Most secure option but less convenient for multi-device access
For Mac Users: macOS has a built-in password manager (iCloud Keychain) that works seamlessly with Safari and can also be used with Chrome. You can choose to save your passkey to iCloud Keychain, which will sync across all your Apple devices (Mac, iPhone, iPad).
-
Follow the prompts to create your passkey:
- Your device or password manager will ask for verification
- This may include:
- Biometric authentication (fingerprint or face recognition)
- Device PIN or password
- Google account password (if using Google Password Manager)
- Complete the authentication to create the passkey
-
Give your passkey a recognizable name to help you identify it later:
- Examples: "Chrome on Work Laptop", "Google Password Manager", "Personal Mac", "YubiKey"
¶ Using Google Password Manager (Recommended)
Google Password Manager is the recommended option because it's built into Chrome and syncs seamlessly across all your devices.
¶ Why Choose Google Password Manager?
- No installation required - Built into Chrome browser
- Automatic sync - Access your passkeys on any device where you're signed into Chrome
- Cross-platform - Works on Windows, Mac, Linux, Android, and iOS
- Free - No subscription needed
- Secure - Protected by your Google account security
¶ Setting Up with Google Password Manager
- When setting up a passkey on id.ipb.pt, click Set up Passkey
- Select "Use a phone, tablet, or computer" or "This device" (depending on your Chrome version)
- Chrome will prompt: "Save passkey to Google Password Manager?"
- Click Continue or Save
- Authenticate with your Google account if prompted
- Your passkey is now saved and will automatically sync to all devices signed into your Google account
¶ Accessing Your Passkeys
You can view and manage your passkeys at:
- passwords.google.com - View all saved passwords and passkeys
- Chrome Settings → Autofill → Password Manager → Passkeys
¶ Using Bitwarden to Store Passkeys (Alternative Option)
Bitwarden is a free, open-source password manager that can securely store your passkeys and sync them across devices. This is a good alternative if you prefer not to use Google Password Manager.
¶ Installing Bitwarden Browser Extension (Chrome)
- Open Google Chrome
- Click the three dots (⋮) in the top-right corner
- Select Extensions → Visit Chrome Web Store
- In the search bar, type "Bitwarden Password Manager"
- Click Add to Chrome
- Click Add extension to confirm
- Create a free Bitwarden account or sign in if you already have one
¶ Using Bitwarden for Passkeys
- When setting up a passkey on id.ipb.pt, click Set up Passkey
- Choose Bitwarden from the available options
- Bitwarden will prompt you to save the passkey
- Confirm and give it a recognizable name
- Your passkey is now securely stored and synced across all devices where you use Bitwarden
Note: While Bitwarden offers paid plans with additional features, the free version is sufficient for passkey storage and syncing.
¶ Using a USB Security Key (Hardware Option)
If you have a physical security key (like a YubiKey), you can use it for maximum security.
¶ Setting Up a USB Security Key
- When setting up a passkey, select "USB security key"
- Insert your USB security key into your computer
- Follow the on-screen prompts:
- You may need to tap or press a button on the key
- Some keys require a PIN
- Your passkey is now stored on the physical key
Note: You'll need to have the USB key with you whenever you want to sign in. This is the most secure option but less convenient for everyday use across multiple devices.
¶ Signing In with a Passkey
Once configured, your login experience is simplified:
- Go to id.ipb.pt
- Enter your username
- Click Continue or Next
- You'll be prompted: "Sign in with passkey?"
- Approve the request using:
- Google Password Manager: Authenticate with your device PIN, fingerprint, or face recognition
- Bitwarden: Unlock your Bitwarden vault and select the passkey
- USB Security Key: Insert your key and tap/press the button
- Mac iCloud Keychain: Authenticate with Touch ID or your Mac password
- You're logged in! No password or OTP needed.
Tip: The first time you sign in with a passkey on a new device, you may need to authenticate with your Google account (for Google Password Manager) or unlock your password manager to access the synced passkey.
¶ Managing Your Security Settings
¶ Accessing Your Security Settings
Visit: https://id.ipb.pt/
¶ Best Practices
-
Keep Your Authenticator App Secure
- Never share your OTP codes
- Keep your phone locked with a PIN or biometric lock
-
Use Passkeys When Possible
- Most convenient and secure option
- Works across devices with password managers like Bitwarden
-
Regular Security Checks
- Review your connected devices periodically
- Remove any devices you no longer use
-
Backup Your Authenticator
- Some apps like Microsoft Authenticator offer cloud backup
- Consider setting up multiple authentication methods
¶ Troubleshooting
¶ Lost Access to Authenticator App
- Contact the Communications Center or report at https://suporte.ipb.pt to the removal of the current Autenticator from the settings
- After confirmation by CCOM, you must log in again and configure a new Authenticator immediately
¶ Passkey Not Working
- Ensure your browser is up to date
- Check that your device supports WebAuthn/FIDO2
- Try using a different browser or device
¶ Need Help?
Contact the Communications Center or report at https://suporte.ipb.pt for problems that you cannot solve using the recovery codes.
¶ Summary
You now have multiple layers of security protecting your account:
- Password - Your first line of defense
- Mobile Authenticator (OTP) - Required for all users
- Passkey - Convenient, passwordless authentication
By using all these methods, you ensure maximum security and convenience for your account at id.ipb.pt.
The security of IPB’s electronic services depends on every link — including yours!
Stay secure! 🔐